Five Favorite Finishes in 2018

I am joining the Best of 2018 Linky Party hosted by Cheryl@Meadow Mist Designs. I’ve chosen to share my five favorite finishes in 2018. Starting with my Summer Sampler 2017, this is my all-time favorite quilt that I’ve made. While making this quilt, I went from having beginning paper-piecing skills to a whole new level of confidence. I actually just put it back on my bed today after removing a Christmas throw and several Christmas pillows. It’s so nice to see it again!

Summer Sampler 2017

My second favorite finish is the Wedding Whirl quilt that I made for my stepdaughter, Alisha, and her new wife, Wendy. I’m sure my regular blog readers are a little tired of this project, but I couldn’t write about favorite finishes and not include it!

Wedding Whirl Quilt

Next is a pair of Quatrefoil French Bulldog quilts for a set of adorable twin baby girls:

French Bulldog Quilt

The fourth finish this year that I’m including is the Butterfly Quilt that I made for my best friend (along with three coordinating butterfly pillows):

Butterfly Quilt

And my last big finish of 2018 is the Feathers Quilt that I made for my niece, Kim.

Obviously I’ve developed a taste for bright, saturated colors. You’ll see more of them next year, but look for my first 2019 project to be a more manly, subdued quilt. It’s definitely different from any of the quilts pictured above. I’ll be posting about this project in early January on Elm Street Quilts: One Monthly Goal.

Happy New Year!

Posted in 2018 Quilts | 4 Comments

Dec ‘18 OMG Finishes

My December ‘18 One Monthly Goal was to make a total of four pillow covers. For Christmas for my stepdaughter, Alisha, and her new wife, Wendy, I made two teal/whirl bed-size shams to go with their Wedding Whirl Quilt wedding present. I can’t wait to see a picture of the pillow shams with the quilt. These pillows are one of my 2018 Qtr 4 Finish-A-Long goals.

The table that the pillows are on is my big Christmas gift this year from my best friend (also named Mary). It is a 26” x 56” custom pressing station. The top is removable but is secured with four custom-made wooden “L-brackets” so the top does not move around at all. It sits on a sit-to-stand desk that I hope to put to use when I get EQ8 for my birthday in March. For the past year I’ve been using a modified ironing board that a friend made me using a tutorial by Quilting Jetgirl, but I think my original ironing board was too flimsy, so it wasn’t as stable as I wanted. It is so nice to have a larger pressing surface especially when I am pressing yards of backing fabric.

For my friend, Kristen and her son, Aidan, I made two cat-themed Christmas pillows for these cat lovers. I also gave Aidan that cute little glass cat figurine sitting on the table in front of him. Kristen and Aidan love being outside in the snow, which is a good thing since we have a big snow storm coming our way in northern New Mexico!

Linking up to Elm Street Quilts: OMG Dec ‘18 Finishes and 2018 Qtr 4 FAL Link-Up.

Posted in Uncategorized | Tagged , , | 6 Comments

2019 Quilting Goals

Many thanks to Yvonne@Quilting Jetgirl  for hosting another review/planning party. Since December 2015, I’ve joined five of Yvonne’s Planning Parties or Mid-Year Reviews (and just went back and tagged them all “Quilting Goals”). I really like participating in these opportunities to reflect, re-evaluate, re-prioritize, and plan my quilting projects. I feel like I know myself so much better as a quilter and am able to make more intentional choices when I take the time to engage in this process 1-2 times yearly.

Looking Back at 2018

I just took a quick peak at my 2018 Quilting Goals post. In that post I identified that my number one priority was to increase my free motion quilting skills. Well, that didn’t happen. The only quilting foot I used in 2018 was my walking foot, which allowed me to do basic, fairly minimal, and not-too-time-consuming quilting on my smaller projects (I’ve had all my bigger quilts longarm-quilted primarily to reduce strain on my balky shoulders). My 2018 Mid Year Review post reflects much more of my current quilting priorities, and my Four Years of Quilting post shows some of my favorite 2018 quilts along with quilts from previous years. I’ve started to use more vibrant solids and have a better feel for colors that work well together. I have become proficient enough with paper-piecing to call myself an intermediate paper-piecer, and I’ve done some very basic paper-piecing design and re-designs.

 Piecing is in My Blood

One of the things that I have said repeatedly to my mental health therapy clients over the years is that we all have limited resources: time, money, physical stamina, and mental energy, and not one of us can do it all, all of the time. I work full-time as a Behavioral Health Therapist Supervisor (and frequently have to provide direct services when my agency is short staffed). I have become very clear that becoming proficient with free-motion quilting is not something I have the time or energy for at this time. In the best of circumstances, I have about 20 hours a week of prime, focused energy to devote to my quilting endeavors. So like my mother who sent her quilt tops out to the Phillipines in the 80s and 90s to be long-armed quilted (I so wish I could talk to her about that process!), I am choosing to prioritize designing, cutting, and piecing my larger quilting projects (and no longer allowing myself to feel guilty that I’m not doing the actual quilting of these projects). I feel like I should change the name of my blog to Piecing is in My Blood, but I don’t think I will do that!

A Significant Shift

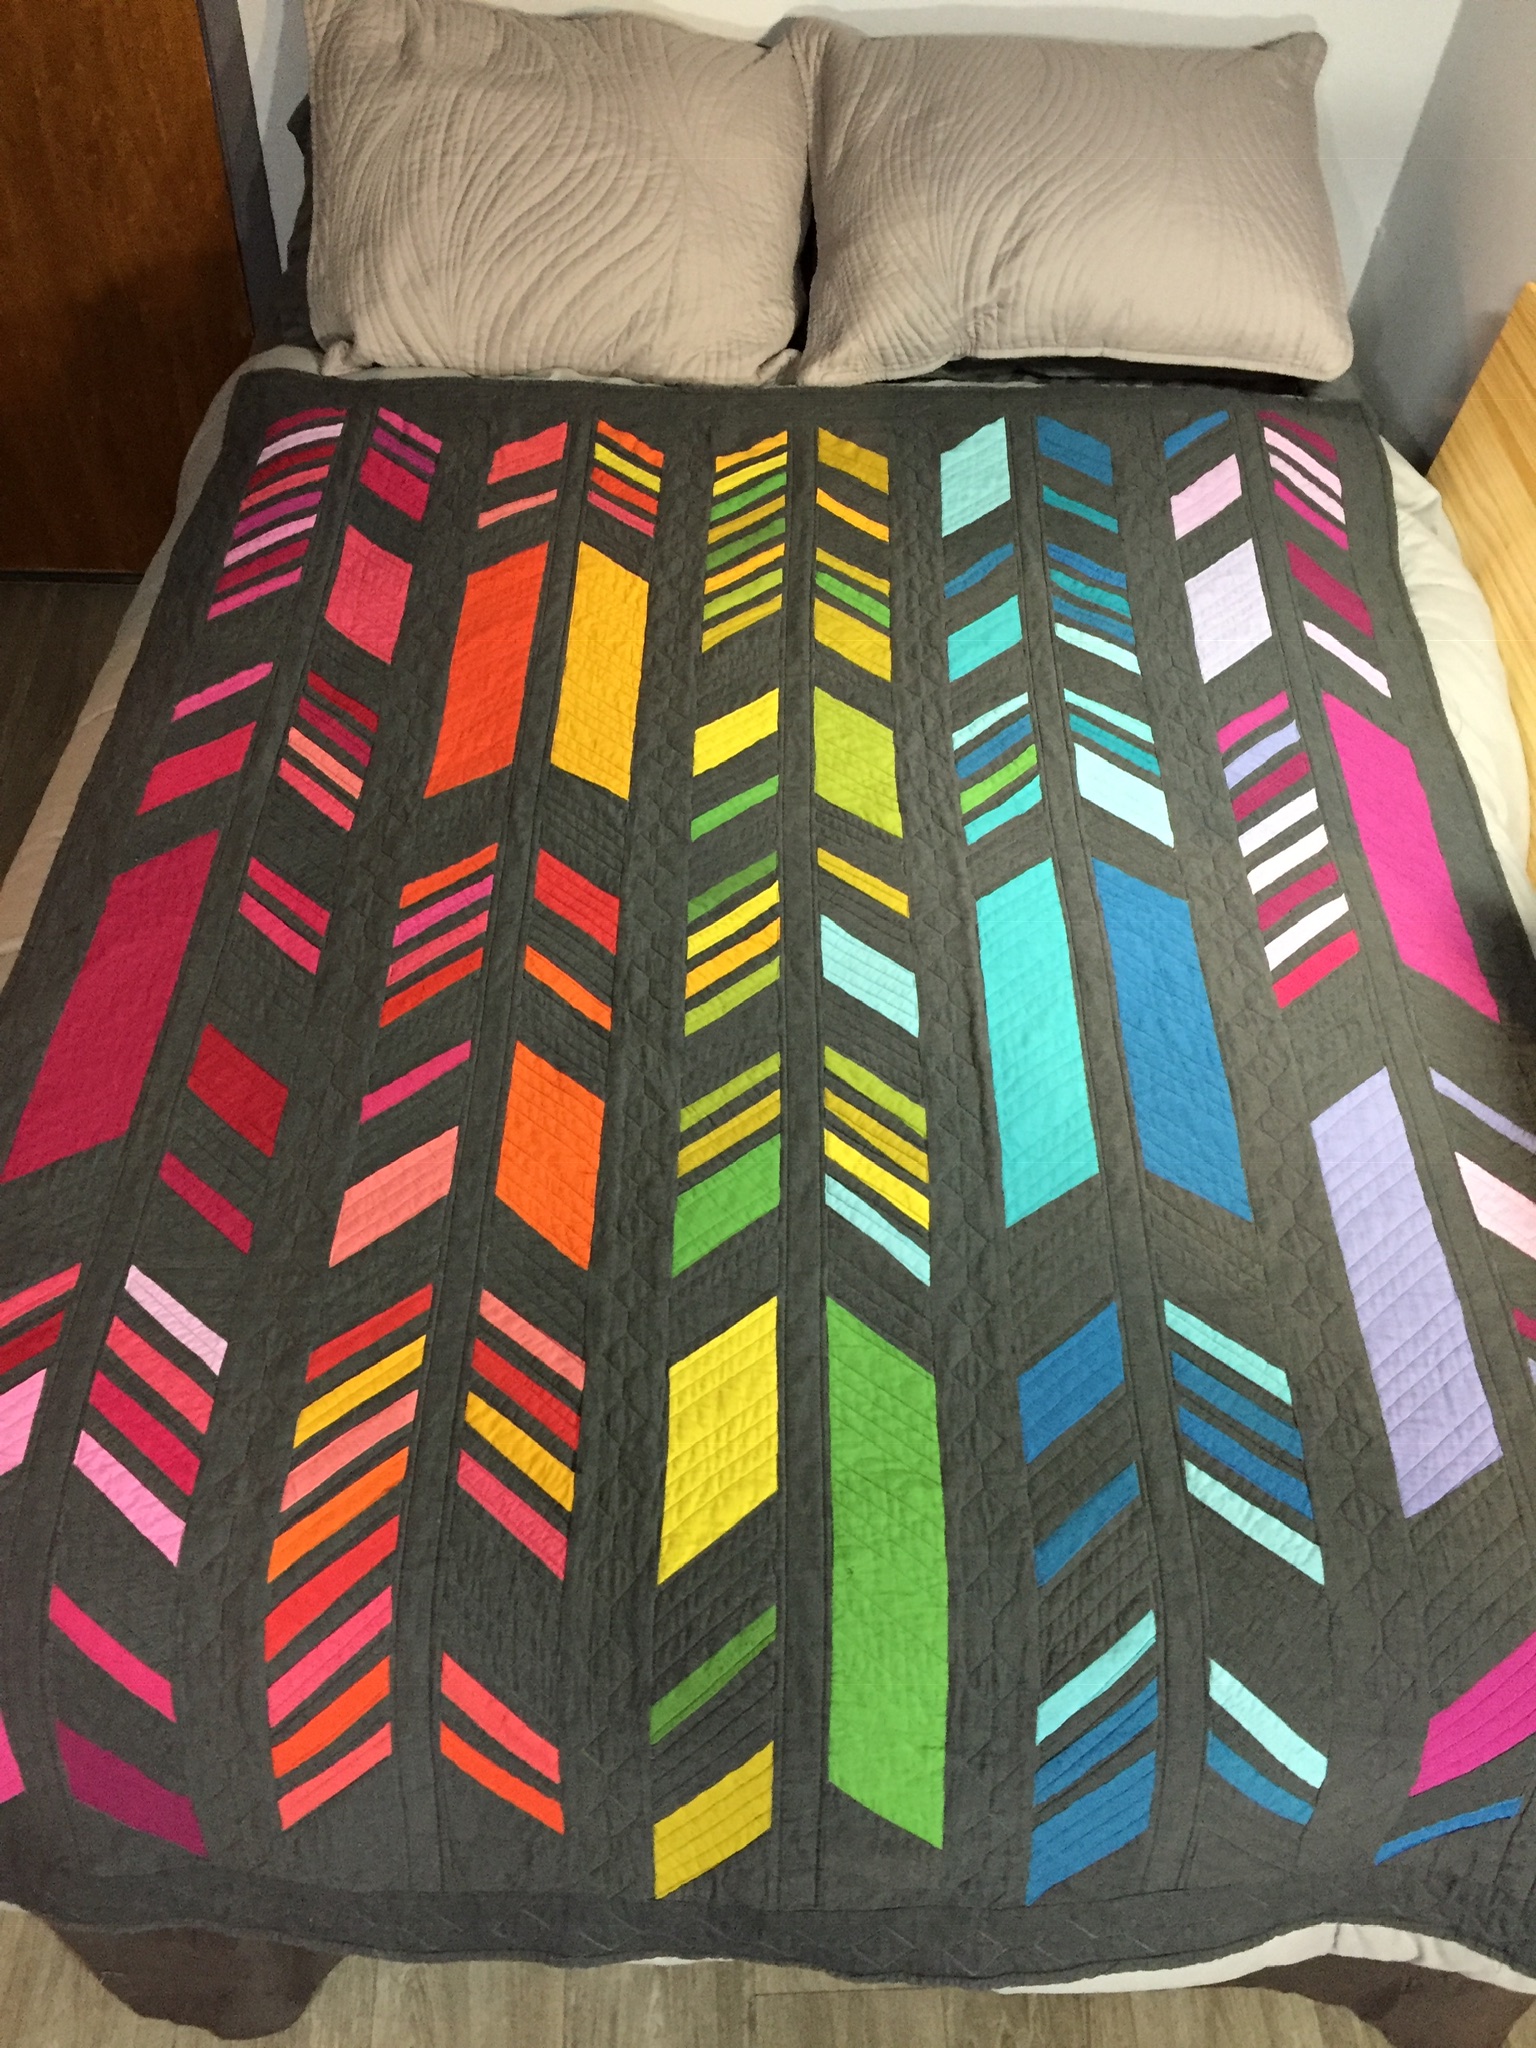
Recently I decided to make another rather significant shift in where I want to go next in my quilting journey. Early in the coming year I plan to start using EQ8. My best friend is getting it for me for my birthday in March. I’ve been starting to read more blog posts about designing with EQ8. I will be participating again this coming year in the IG Honey Bees swarm that chooses from 25 different Bee Hive blocks, and I’ve chosen the Treasure Hunt block when I am the queen bee in March, and have found inspiration from Alyce’s Using EQ8 to Plan for a Quilting Bee post to choose a palette for my 2019 Treasure Hunt quilt. There are similarities with Alyce’s (mustard, teal, aqua) but mine will have dark pink, light grey, and dark grey. I used paper and pencil to make my design choices for this project. I’m pretty sure that I’m going to like the arrangement of my color choices, but I won’t know for sure until I sew up some example blocks. I can’t wait to get EQ8 and start playing with it to be able to know better how color schemes and designs will work. I’ve started to pull fabric for this project. Below is what I’ve pulled so far:

Block of the Month Participation

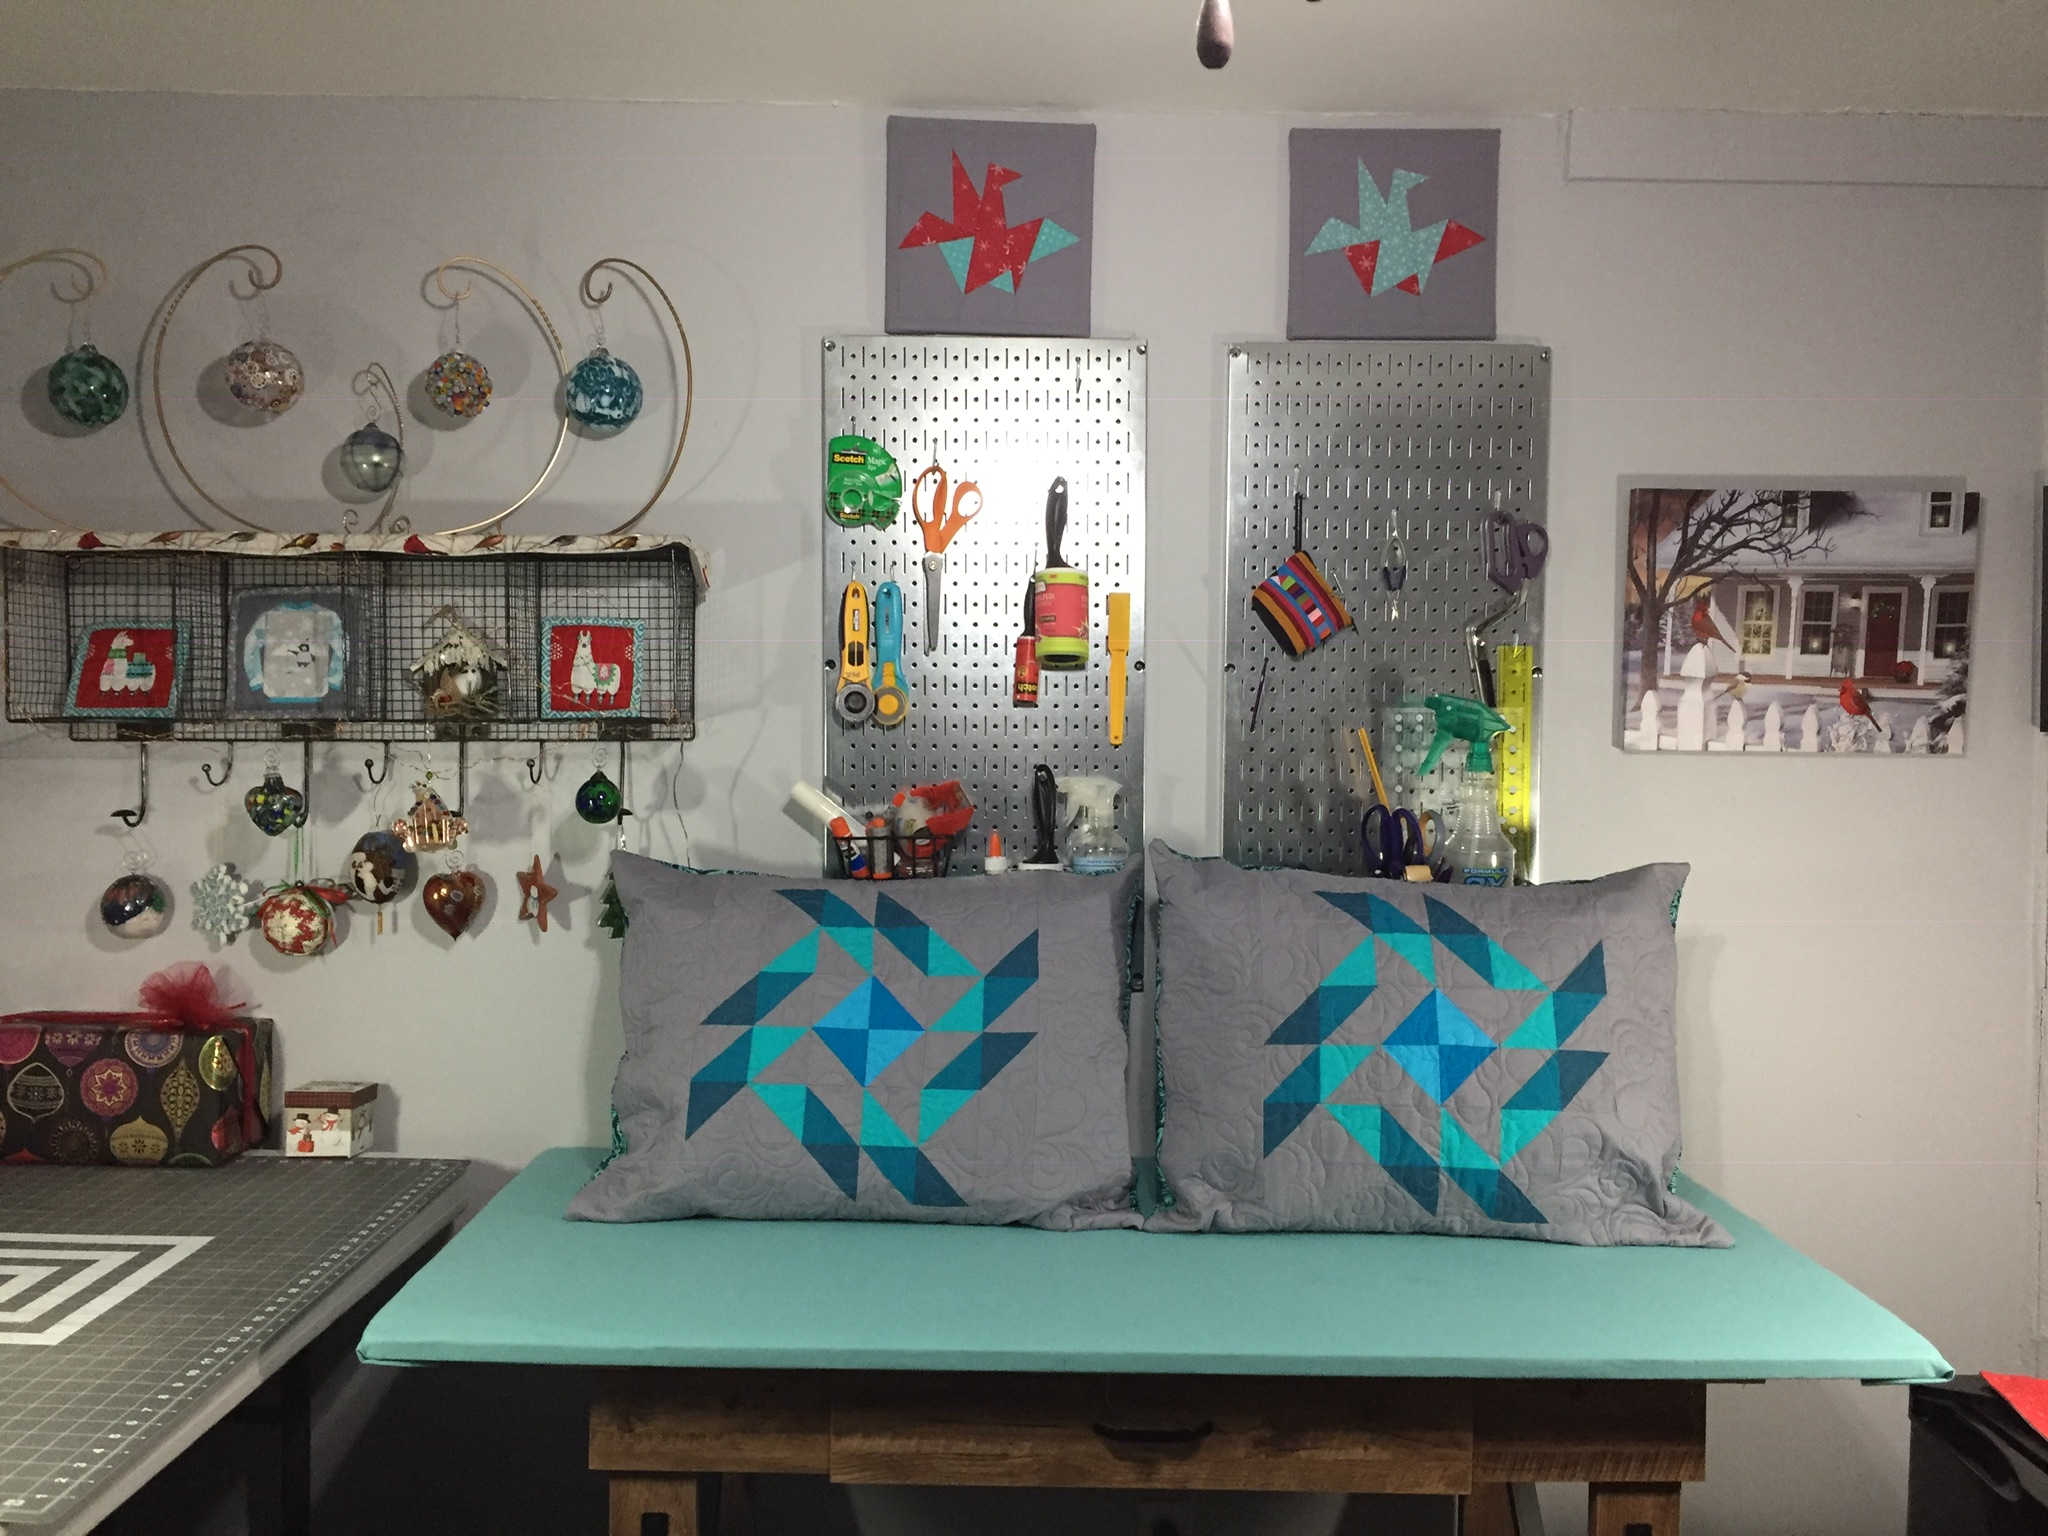
I’m also planning to use the above palette (and some of the same fabrics) for the Perfect HST 2019 Block of the Month  hosted and designed by Lee Heinrich. I used Lee’s Perfect HSTs for some of the HSTs used in the Wedding Whirl quilt that I made for my stepdaughter, Alisha, and her new wife, Wendy. I also used them for all the HSTs used in the coordinating Teal/Turquoise Whirls pillows for their 2018 Christmas present. I really enjoy not having to trim these HSTs and having less wonkiness with smaller size half-square triangles.

The other 2019 Block of the Month project I will be participating in 2019 is Rebecca Bryan’s Stargazer BOM. I am planning to make the lap-size quilt in the main color way: Blue/Green/Lime. I’ve had Rebecca’s Modern Triangle book for awhile now, and I’m really looking forward to making this stunning quilt.

I have been participating in one other Block of the Month program through my local quilt store that started six months ago. Well, not exactly participating. In June 2018 ThreadBear started the 13-month Incandescence Quilt BOM featuring Maywood Studios Gelato Ombre fabric. All I’ve done so far with this project is pick up the monthly instructions/fabric and put them in a bin. I hope to get caught by March. We’ll see!

Donation Quilts

One of my first projects in 2019 is to make a Mercyful Quilt that can be given to a hospice patient at Mercy Hospital in Sacramento, California. Bernie with Needle & Thread has been organizing this quilt drive, and it has a personal connection to me as I grew in Sacramento, and my mother was a pink lady there (the adult version of a candy striper). I’m thinking of using my Carolyn Friedlander Doe layer cake to make a gender-neutral quilt.

I also plan to make a quilt top that will be quilted by @katikat21 on Instagram for “quiltsfordelhi”. The quilts are for children in a shelter in Delhi, and specific sizes are requested (36”x48”, 36”x60”, and “58”x72”) to correspond with the sleeping mats at the shelter. See Quilts for Delhi for more information. Again, I’m leaning toward making this quilt top gender neutral.

Other Quilts

There are four other quilts that I plan to make or at least work on in the coming year.

  1. It’s time for a new quilt for my bed. I have five yards of beautiful turquoise ombre fabric and want to make Hunter’s Design Studio’s Ombre Star Quilt. I love the description on the front of the pattern that says another “so much easier than it looks” pattern.
  2. My friend, Kristen, will be getting her master’s in Social Work in May ‘19, and when I saw this Memoir Quilt Kit on Hawthorne Supply Co., I thought the Memoir quilt would be the perfect gift to commemorate this fantastic accomplishment. 
  3. I’ve been thinking about making a Temperature Quilt for several months since I saw them popping up on Instagram. Patty at Elm Street Quilts wrote a great Tutorial on making different kinds of temperature quilts. I’m leaning toward making one with 2”x 4” flying geese with the geese part designating the high temp for the day and smaller triangles showing the low temperatures. I’m still figuring out the colors that I will be using.
  4. I’ve had a fat-quarter bundle of S’more Love fabric for three years or so thinking that I would make a throw-size quilt that my brother and sister-in-law can use in their motor home. When I saw Sew Shabby Quilting’s Camping quilting pattern, I thought it would be the perfect quilting motif for an RV quilt. I’m leaning toward using paper-pieced economy blocks for the quilt top and a grey grunge fabric on the back that will show the awesome camping quilting pattern and will stand up to the dirt and grime that sometimes accompanies camping adventures.

Other Projects That Have Peaked My Interest

That should do it for now! Here’s to a creative and joyful 2019!

Linking up to Quilting Jetgirl’s 2019 Planning Party.


Posted in Uncategorized | Tagged | 10 Comments

Dec ‘18 OMG

My December ‘18 One Monthly Goal is to make four pillow covers. I’m making two Christmas pillows for my friend, Kristen, and her son, Aidan, with some great Christmas fabric for these cat-loving friends. I really love the red text fabric that I will use to make the envelope backing with quotes like, “You had me at meow,” and “A cat can purr its way out of anything.” (mine definitely can!)

The other two pillows are the teal/turquoise whirls pillow shams that I wrote about in my 2018 Qtr 4 FAL Goals post. Melissa at So Shabby Quilting has finished the quilting, so I hope to finish them up soon in time to send off for Christmas. The pic below shows the teal/turquoise whirls before I added strips of grey to turn them into a “quilt top” for Melissa to quilt, and then I will cut the quilt into two pieces to make them into pillow shams.

Linking up to Elm Street Quilts: Dec ‘18 OMG.

Posted in 2018 Quilts | Tagged | 7 Comments

Nov ‘18 OMG Finish

My Nov ‘18 OMG was to sew a simple Christmas patchwork cover for my cutting mat. I was able to get it done early in the month and enjoyed working with all the festive Christmas prints in red, green, and aqua (I’m not sure when aqua became a Christmas color, but I am totally on board!) This quilt actually does not quite cover my cutting mat, but I like the look of the small numbers and markings at the edges. It certainly covers up all the unsightly gashes in my cutting mat (perhaps it’s time for a new one in 2019?).

I started to do some Christmas decorating on Thanksgiving, and I love looking at the ornaments I’ve accumulated over the years, especially ones that were given to me by my mom and sister. The photo above shows the cutting mat cover I finished this month as well as a number of soft ornaments that I pinned to the design board that I keep behind my cutting table. Don’t worry I am still using my big design board for working on quilting projects over the holidays (and of course I still have plenty to work on!). The close-up below shows two of my mom’s quilting ornaments that I truly treasure:

Another favorite ornament is  the crossstitch angel I made MANY years ago, probably in my 20s, that I still love to pull out of its protective tissue paper wrapping every Christmas.

Do you have some special ornaments that you can’t wait to hang at Christmas?

This was one of my 2018 Qtr 4 FAL Goals. Linking up to Elm Street Quilts: Nov ‘18 OMG Finishes. Also linking up to 2018 Qtr 4 FAL Link-Up.

Posted in 2018 Quilts | Tagged | 7 Comments

Feathers Quilt Finished!

Yesterday I finished the Feathers quilt for my niece, Kim. The pattern is by Alison Glass, and it is a fairly easy paper-pieced pattern, though I did modify a couple of the blocks that were giving me some trouble (see my September ‘18 OMG post for more information about this modification). Below is a photo of the finished quilt on my bed, and considering it was taken inside, I think it does a decent job of showing the beautiful Alison Glass Kaleidoscope fabric colors thanks to strategic placing of a couple Ott lights.

Here is a pic of the quilt top taken in my friend’s sun room with a lot of natural light, and the colors don’t look all that different.

Feathers Quilt

The photo below shows the back of the quilt which is pieced from several Alison Glass Art Theory in Charcoal panels:

ThreadBear did the custom quilting on this quilt. I had the idea of parallel grey quilting lines on the feathers, and colorful diamonds in a coordinating color on the wide sashing strips. Then we agreed that the narrow sashing strips would have two lines of quilting also coordinating with the colors of the adjacent feathers. None of the photos I took do a good job of highlighting the quilting, but the pic below best shows some of the different colors of thread in the quilting.

Yesterday I wrote a Quilt Label Tutorial post and was happy with how the label turned out for this quilt. However, last evening something made me look at the label on this quilt, and I have to say I was momentarily horrified that I had typed “Feather” rather than “Feathers” on the quilt label. But then I decided that it just isn’t that big of a deal. I will explain to my niece that if she wants to read posts about her quilt that she should look for Feathers Quilt posts.

This was one of my 2018 Qtr 4 Finish-A-Long Goals. Linking up to Cooking Up Quilts: Main Crush Monday. Also linking up to 2018 Qtr 4 FAL Link-Up.

Posted in 2018 Quilts | Tagged | 10 Comments

Quilt Label Tutorial

Today I am entering my Quilt Label Tutorial in the Fall 2018 Tips and Tutorials Festival hosted by Yvonne@Quilting Jetgirl and Cheryl@ Meadow Mist Designs. Since I started quilting four years ago, I have attached labels to most of my quilts, but some of them have been an eyesore on the back of the quilt. Awhile back I ran across Pat Sloans Triangle Label Tutorial and modified it to use with Ink Jet Fabric Sheets. I like the look of these labels and think they provide a place for information about the quilt in a relatively subtle manner. I’m still refining this process, but today I’m going to share what I have learned so far about making triangular ink jet labels.

E5D219F0-8D7F-43A2-BDBA-0053313CDCF0

The quilt label above is for a quilt I just finished today which I will blog about soon. Below I have outlined the steps to make a label similar to mine:

  • First you need to figure out what you want to type on the label. Sometimes I center my text, but I find I can fit more information when my text is left-aligned as above.
  • Using some kind of word processing program (I used Google Docs), press the Enter key on the keyboard of your computer several times until you are a little over 5” down and then tab over about 3 1/2”. Then type in the info for your label, keeping about a 2 1/2” right margin.
  • I recommend printing a practice label on regular printer paper, and then place a 5 1/2” ruler “on point” with the black diagonal line even with the top line of text with some space between the text and the diagonal line. Try to center the exact middle of the ruler (depicted with two crossing white lines with a circle in the exact center) with the center of the longest line of text. Trace all around the ruler, but you don’t need to include the dotted line I drew in the second photo below. I drew it to show the fold line.

1927A9ED-0738-4A3E-977C-C3790AF9D77E

1F797C85-CEC0-471A-AB27-3172BEBE19F2

If the paper label looks good, print the label using an Inkjet Fabric Sheet. To keep the ink from smearing when washing the quilt, spray the label with Scotchguard Fabric protector. I let the label dry overnight or at least a few hours.

After the label is dry, I peel off the waxy paper on the back, and the trace my 5 1/2” ruler on point as I did on the practice paper label and use my rotary cutter to trim the label to a diamond shape. I fold the label in half, and usually it is slightly uneven:

B9DC30DD-5C9A-4FBA-AB4C-39A9543F50F3

I then trim each side of the label at least 3/8” from the edge of the text on each side of the label:

178B902A-574A-4BC0-B286-808CF77491E1

Sometimes I just sew the plain white triangle on my quilt, but it looks nicer with a border sewn to the top of the label. Below is how I finished the label for my Feathers quilt:

  • Cut a strip of fabric at least 1 1/4” by 8 1/4”. I like to use the same fabric that I used for the binding.
  • Fold over the edge 3/8” and press down the fold. I prefer using the Clover Hot Ruler, but the Dritz EZY-HEM ruler has a clearer marking for 3/8”, so that’s what I used when making the top border for this quilt label. Be forewarned. The metal ruler below can get very HOT when using it to press a folded edge!

502DC97F-695C-491B-9A3C-5E68E6FCBC3C

Next I trimmed the strip with the folded edge to 3/4”:

D4991CB1-9726-40C0-9685-157C78F60046

I then applied a little bit of glue with a glue stick and centered the raw edge of the strip pictured above on the top of the white triangle label (with the folded side up), using a couple pins to ensure the strips stayed put,  and sewed the strip to the label using a 1/4” seam (sorry, I forgot to take a photo of this step). Below is a pic of the label with the strip sewn on:

2ED94533-2D4E-49A0-B6A9-F5B48789D2D2

I then trimmed the ends of the strip off even with triangle:

6CF88CFC-1021-47F8-9B35-6B04BEBC828C

I used a combination of glue and pins to secure the label to the back of the quilt (again no photo!). Below is a pic of the label after I machine-stitched the binding onto the back of the quilt.

57D8CD74-2E25-4AEE-88D6-4096DE124E29

Before I start hand-stitching the binding to the front of my quilt, I always hand-stitch the border on the top of the label to the back of the quilt. If I were to try machine-stitching my binding on both the back and front of the quilt, I would sew a border on all three sides of the white triangle label.

Linking up to Fall 2018 Tips and Tutorials Festival: Other Sewn Or Quilted Item Tutorials Section. There are already some great tutorials posted. Let’s go check them out!


Posted in Uncategorized | Tagged | 4 Comments

Nov ‘18 OMG

For the first time in awhile, I am planning to finish only one project for my monthly goal. I am making a Christmas patchwork cover for my cutting mat. Below are the 54 squares that are 4.5” each.

3E83CDA1-4847-43AB-BC7D-C80EF21E6D7C

I plan to simply quilt it and get it bound this month, so it can be part of the holiday decor in my bedroom/quilting studio. Of course I will be working on other things, but this time of year, a lot of sewing is secret sewing. I’m sure many of you can relate!

I’m wondering who else is working on holiday projects this month?

Linking up to Elm Street Quilts: Nov ‘18 OMG.


Posted in 2018 Quilts | Tagged , | 8 Comments

Christmas Baubles Mini Quilt

BD8DB029-3B68-43E4-AE00-75269BD7B20A

I just posted yesterday about this Christmas Baubles Mini Quilt in my Oct 2018 OMG Finishes post, but then two things happened. I woke up to a couple inches of snow this morning and thought this mini quilt was just made for snow quilt photography, and I had a question that I forgot to ask my blog readers. I want to know what marking tool you use to mark lines for quilting on fabric that is predominately white. I think some of you might respond that you use a Hera marker (which I have but could not find Sunday when I quilted this mini), and because I generally use 100% cotton low loft batting, I have found that the lines that I make with the Hera marker tend to quickly disappear. I ended up using masking tape to mark my lines which worked okay but definitely is not the best marking solution.

So if you use the Hera marker, what kind of batting do you use? And if you use something besides the Hera marker for white or whitish fabric, what marking tool works best for you?

Linking up to Cooking Up Quilts: Main Crush Monday. This mini quilt was one of my 2018 Qtr 4 Finish-A-Long Goals. Linking up to the 2018 Qtr 4 FAL Link-Up.


Posted in 2018 Quilts | Tagged , | 3 Comments

Oct 2018 OMG Finishes

I’m glad this month has 31 days because I needed almost all of them to get both of my Oct ‘18 OMG projects finished. First up is my Floating Hexagons quilt that was a pattern test for Sarah Goer Quilts. Please see my Oct ‘18 OMG post for all details. Many of you know that quilt photography is a challenge for me, but since yesterday was such a beautiful day, I drove to one of the local parks and took pictures on the steps of the plaza pavilion. I think they turned out fairly decently and certainly shows the truer colors of the Kona Cerise and Berry better than my inside pic in my post above.

6E901E5A-4EF1-4CBD-A524-CAD438CCF0D9

I’m so happy with the quilting that Melissa of Sew Shabby Quilting did (and shout out to Sarah Goer for suggesting the diagonal plaid quilting motif).

E2DA9B97-7091-4E5B-A7F4-088E2ED92249

I used Alison Glass’ Pearl in Cerise fabric for both the back and the binding, and I really like how it turned out. On the front, the narrow binding gives just a hint of a contrasting splash of color, and on the back, the binding and backing fabric appear to blend seamlessly (at least in my humble opinion!).

911D0872-ADB0-40B0-B0A9-FF5BDD2541F1

I have finally figured out what works best for me as far attaching a label to my quilts though I am still refining the process. The close-up of the label below is a little off center, but I think I’ve figured out how to easily get it centered, and I’m planning to write a quilt label tutorial for the Fall 2018 Tips and Tutorials Festival hosted by Yvonne of Quilting Jetgirl and Cheryl of Meadow Mist Designs. Finishing this quilt was one of my 2018 Qtr 4 Finish-A-Long Goals.

D90399E5-7CA6-4F3A-A625-D4D822094D03

The other project I finished for my October One Monthly Goal is the Christmas Baubles Quilt by Jen Daly for Moda Bake Shop. I shamelessly used the same Kate Spain Jingle fabric that Jen used (that I purchased in 2015) and also quilted my mini quilt in the same manner as Jen, though the lines that she used to outline the tree are definitely straighter than mine! In the photo below that I took this morning, this mini quilt that measures 18” x 24” looks as big as the shed behind it! I was trying to get a Christmasy look by attaching it with clear binding clips to a pine tree in my yard.

C4A40035-D23B-42CD-80F5-9837E9D3D178.jpeg

I took another photo at lunch time on my portable design wall with a 6” x 24” ruler next to it. The back door was open, so the indoor light isn’t too bad with this pic:

99E9180B-752C-4A44-B74E-A13FD5B4A39D

Linking up to Elm Street Quilts: Oct ‘18 OMG Finishes. Also linking up to 2018 Qtr 4 FAL Link-Up.

Posted in 2018 Quilts | Tagged , , | 9 Comments